Following my previous article, ‘Integrating ER Export Formats into the UI’, let’s now take a look at import messages.
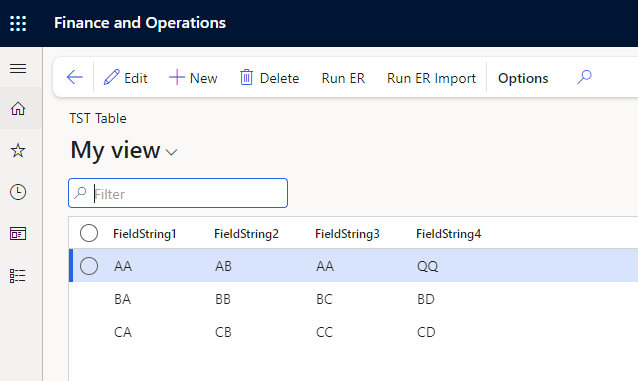
I’m starting with a very simple model, an import format and an import mapping (direction to destination). In the mapping, there are two user input parameters, ‘string1’ and ‘string2’. These parameters serve as the keys for the table into which we are importing. The format includes two fields that are filled with data from a text file. The mapping simply updates a single record based on these keys with the fields from the format:

The ‘Integration Point’ is used to filter the ER lookup and execute the mapping. To select an Integration Point, simply mark the checkbox on the table we are pointing to.

Now, let’s open Visual Studio and begin by creating the import lookup, using the EDT ‘ERModelMappingID’. This field will be located in a parameters form, and the user will use this lookup to parameterize the mapping responsible for importing the data. While it’s technically a mapping and not a format, users select the mapping part of the format. So in practice, it’s as if this lookup pointed directly to a format.

After dragging the ‘EDT’ into place, let’s change the name of the field and the automatically created table relation by adding at least our model’s prefix.
Now, we can add the new field to the form. At this point, I had to restart Visual Studio so the form would recognize the new field in the data source. 🙄

Now, let’s override the ‘OnLookup’ method of our field. This adjustment will ensure that the lookup only displays mappings where the integration point is our specified table (‘TST_Table001’).

I’m going to reuse the same class that I used for the export format, so let’s paste our event there:

Let’s add the code inside (refer to the first picture in this post to find the string for the lookup).
ERModelMappingTable::lookup(
                sender,
                'ERTableDestination#TST_table001');

        FormControlCancelableSuperEventArgs cancelableArgs = e as  FormControlCancelableSuperEventArgs;
        cancelableArgs.CancelSuperCall();
If you prefer a more purist approach, you could use:
ERModelMappingTable::lookup(
                sender,
                classStr(ERTableDestination) + '#' + tableStr(TST_table001));
If it doesn’t compile, you may need to add the ‘ElectronicReporting’ and ‘ElectronicReportingCore’ references to your model.

Now, let’s open up the filtered lookup:

The final step involves adding a button to the form and writing code to execute the ER, which will pass the parameters (keys of the current record) to the mapping.
We will begin by creating a new class for the code:

internal final class TST_ERRunnerImp
{
    static void main (Args _args)
    {
        TST_table001 tst_table001;

        // Retrieve the record from where we are calling our ER
        select firstonly * from tst_table001 where tst_table001.RecId == _args.record().RecId;

        // Pass the two parameters
        ERModelDefinitionInputParametersAction  obj = new ERModelDefinitionInputParametersAction();
        obj.addParameter('String1', tst_table001.FieldString1);
        obj.addParameter('String2', tst_table001.FieldString2);

        // Execute the ER, where the first parameter is the ER mapping and the second is the integration point
        ERObjectsFactory::createMappingDestinationRunByImportFormatMappingId(
            PurchParameters::find().TST_ERModelMappingIDForTstTable,
            'ERTableDestination#TST_table001')
            .withParameter(obj).run();
    }
}
Now, we can create a new ‘Action Menu Item’ that points to our class and add it to our form:

Let’s compile the code and test it! 🚀
Leave a Reply